...
Configure DNIS (Facility)
In the sample inbound diagram, DNIS is 5629920. This is the first VDN that receives the inbound call that helps us to identify the Caller ID (ANI).
The steps to add new DNIS as below:
- Menu navigation: Configuration → Screen Pop→ DNIS
- Click Add button
- Enter the required information and click Update button
Ref: Include Page Add new DNIS Add new DNIS Add new DNIS
Configure Skill Extension
In the sample inbound diagram, Skill extension is 1037495. This is the Hunt Group Extension (not Skill ID).
The steps to add new Skill extension as below:
- Menu navigation: Configuration → Screen Pop→ Skill Extension
- Click Add Skill Extension button
- Enter the required information. Make sure:
- Hunt Type is "Hunt Skill"
- Registered checkbox is checked
- Click Update button
Configure Agent Extension
1. Create an agent account to login to the agent dashboard.
Login web application with administrator privilege to create the agent account.
Access to https://your-server-name/LinkScopeWeb, and then log in to the web application using your credential information.
Step 1: Create a VDN.
An agent VDN is a queue for the caller to wait before talking to an agent.
Step 1.1: Navigate to the following: Configuration→ Screen Pop→VDN

Step 1.2: Click ![]()
Step 1.3: Enter the required information:
• VDN: A number to identify the Skill/Queue
• VDN Name: Skill/Queue name
• VDN Type: Agent VDN
• Associated DNIS: The DNIS received an inbound call before routing the call to the queue.
• Language: English
• Survey Number: 0
• Actual Queue: Select a queue from the dropdown
• Route to Next VDN: blank.
• Media Type: Phone Call, Chat

Step 1.4: Click ![]()
Step 2: Create an agent account.
Step 2.1: Navigate to the following: Configuration→ Screen Pop→ Agent

Step 2.2: Click 
Step 2.3: The required information:
• Agent ID: 50015
• Agent Name: Primas Agent
• Agent Password: 50015
• Agent Skills: 20031, 20032, 20033
| Info |
|---|
Agent Skills are the above created VDN. |

Step 2.4: Click ![]()
Step 3: Create an agent extension
| Info |
|---|
Note: Agent ID and Extension are the same. |
Step 3.1: Navigate to the following: Configuration→ Screen Pop→ Agent Extension

Step 3.2: Click ![]()
Step 3.3: Enter the following example:
• Extension: 50015 (the same name as the agent ID)
• Extension Type: Live Agent Extension
• Phone number: 7412309890
• Registered: Click this checkbox
• Allow Remote Login: Click this checkbox
• Enable WebRTC: Click this checkbox

Step 3.4: Click ![]()
Step 4: Create a web notifier account for the agent.
Step 4.1: Navigate to the following: Configuration→ Screen Pop→ Notifier User

Step 4.2: Click ![]()
Step 4.3: Enter the following example:
• User Name: 50015
• Email: 50015agent@gmail.com
• Location: Genfinity 1 (choose the location the agent belongs to)
• Password: 50015
• Confirm Password: 50015

Step 4.4: Click ![]()
...
The Agent Extension is an Avaya Station ID. All agent extensions belong to the FreedomQ Hunt Group need to be added into the system for monitoring.
The steps to add new DNIS as below:
- Navigate to menu Configuration → Screen Pop→ Agent Extension
- Click Add Agent Extension button
- Enter the required information
- Make sure the Registered checkbox is checked
- Click Update button
Configure Agent Login ID
The steps to add new Agent ID as below:
- Navigate to menu Configuration → Screen Pop→ Agent
- Click Add Agent button
- Enter the required information
- Make sure the correct Skills extension of the Agent are selected from the Agent Skills box. This helps system determine the agent skills to filter agents from the FreedomQ dashboard as well as check the agent available from a Skill.
- Click Update button
Ref: Add new Agent
Configure Notifier User
A Notifier user is needed for an agent to receive the screen pop.
The steps to add new Notifier as below:
- Navigate to menu Configuration → Screen Pop→ Notifier User
- Click Add User button
- Enter the required information
- Click Update button
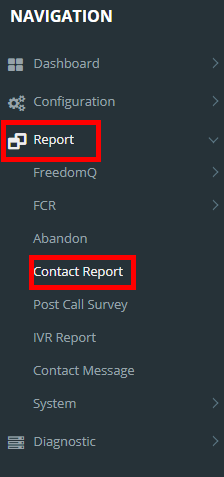
View contact report
View contact report to hear the conversation record between the agent and the customer.
...
Navigate to the following: Report → Contact Report
...
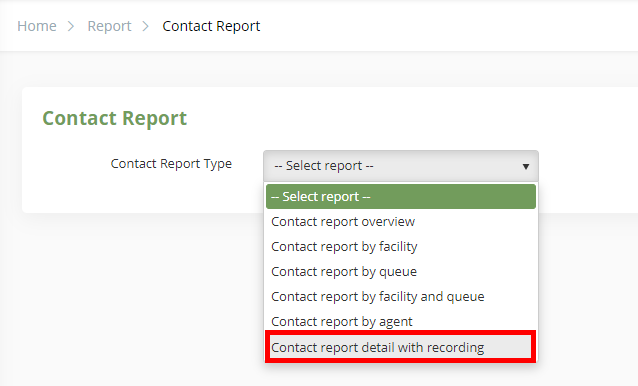
Chose contact report type: Contact report detail with recoding
...
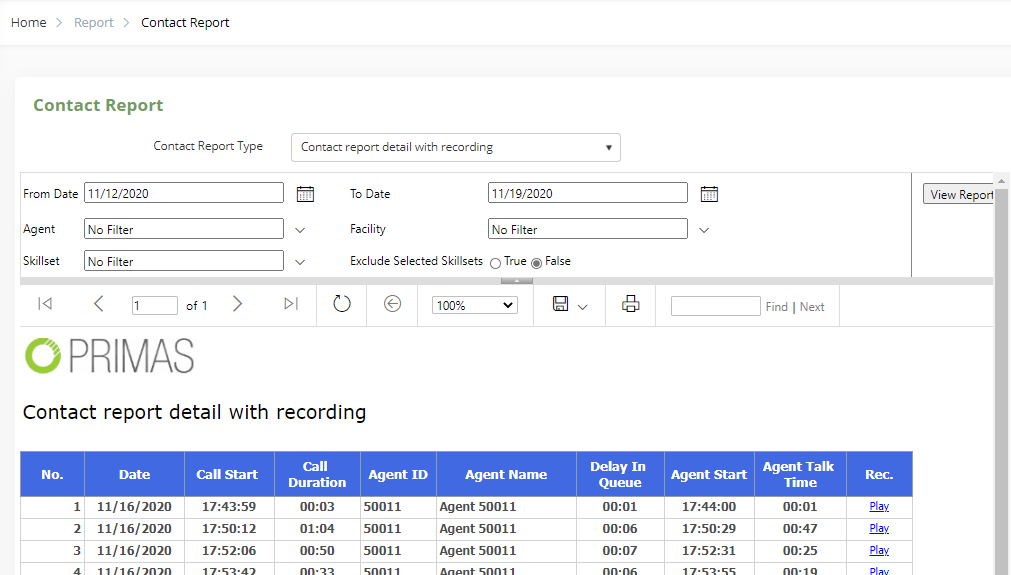
This is the contact report
...
Search

• Date: Search for day
• Agent: Search for agent ID
• Skillset: Search for skillset(It is VDN)
• Facility: Search for facility
• Exclude Selected Skillsets
...
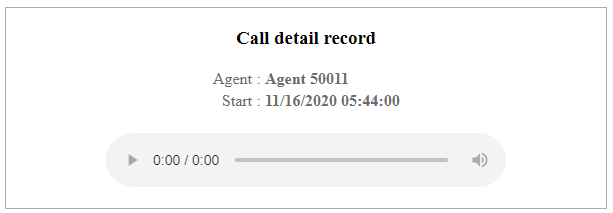
The detail record
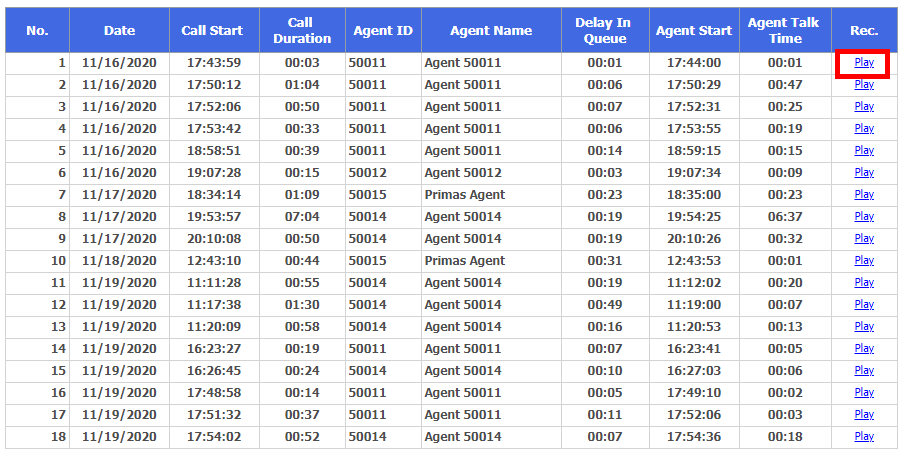
Click Play to hear the record.
...
This is the record
For the agent role.
Login web application
...