Step-by-step guide
- Go to Linkscope Web application and if you're not already signed in, select Sign in.
From the Linkscope Web application, you click to Configuration → General → Company at the menu.
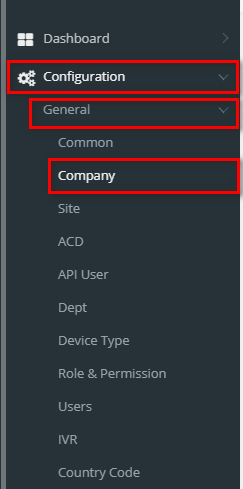 Image Added
ADD NEW A COMPANY
Click  Image Added button, the Add popup is displayed.
- At the Add popup, enter your Company Name into the textbox. Then click the Update button.
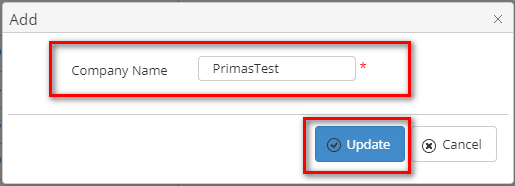 Image Added
If the system shows this message, you created successfully a company.
 Image Added
EDIT A COMPANY NAME
- On Company List table, select any row you want to edit the company name.
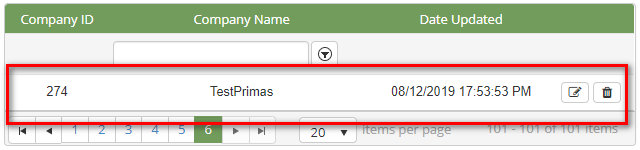 Image Added
- Click
 Image Added button on that row. The Edit popup is displayed.
- At Edit popup, modify the company name into the textbox. Then click the Update button.
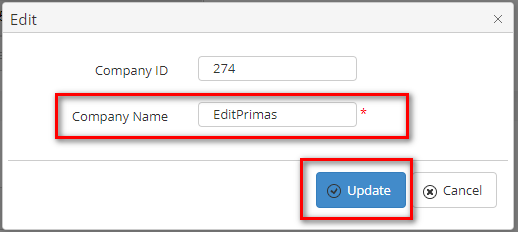 Image Added
If the system shows this message, you edited successfully a company.
Image Added
DELETE A COMPANY NAME'
- On Company List table, select any row you want to delete the company.
Image Added
- Click
 Image Added button on that row.
- There're alert displays after you click to this button. Select OK.
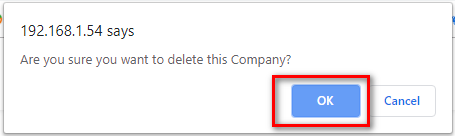 Image Added
If the system shows this message, you deleted successfully a company.
 Image Added
SEARCH A COMPANY
On the Company List table. You can search for a Company Name by searching the Company Name field.
 Image Added
IMPORT FROM/ EXPORT TO AN EXCEL FILE
| Excerpt Include |
|---|
| Import from/Export to Excel file |
|---|
| Import from/Export to Excel file |
|---|
| nopanel | true |
|---|
|
 Image Added
Related articles
| Content by Label |
|---|
| showLabels | false |
|---|
| max | 5 |
|---|
| spaces | PRIMASCX |
|---|
| showSpace | false |
|---|
| sort | modified |
|---|
| reverse | true |
|---|
| type | page |
|---|
| cql | label = "kb-how-to-article" and type = "page" and space = "PRIMASCX" |
|---|
| labels | kb-how-to-article |
|---|
|