Step 0: First-time setup
This step only needs to do once if you haven't installed Primas Web Notifier and Softphones yet.
Click to view detail
Step 0.1: Install Primas Web Notifier (Chrome Extension)
Web Notifier helps to show screen pop to the agent. The extension only supports Google Chrome or MS Edge web browser
- If you use Chrome:
- Click here, it will open a new tab. In the new tab, click
 to install the extension.
- If you use MS Edge (Chromium):
- Open a new browser tab, enter edge://extensions in the address bar to open the Edge extension page, and make sure the option Allow extensions from the other stores at the bottom-left of the page is on.
- Click here, it will open a new tab. In the new tab click
 to install the extension.
Optional step: Pin the Primas Web Notifier icon
After installing the Primas Web Notifier, you should see this icon at the top-right of the web browser. If you don't see this icon, you can click on the icon
  at the top-right corner of the web browser, find the Primas Web Notifier, click the icon
  on the
It will pin the Primas Web Notifier extension to the browser toolbar so that you can find the extension easier.
The demo will use 2 softphones for text messages and phone calls.
Softphone for Text message
- Download Swift XMPP client here
- Install the Swift XMPP client softare.
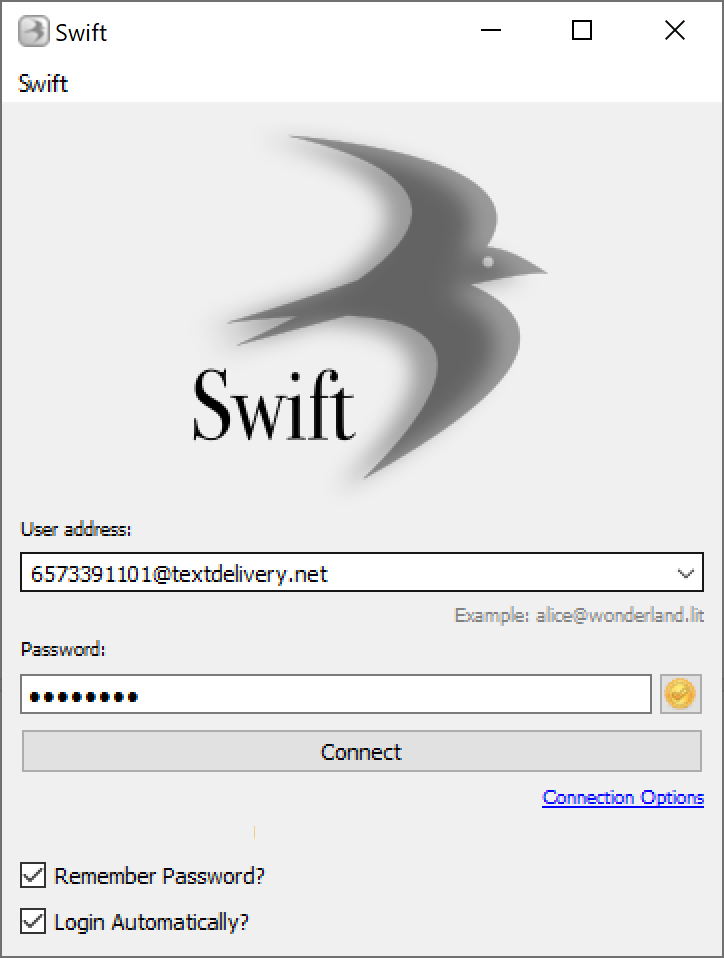
- Run the software and login using the credentials below:
- User name: 6573391101@textdelivery.net
- Password: 11
- Check the box "Remember Password" and "Login Automatically"
- Click Connect to login and start sending/receiving the text message.

Softphone for phone call
- Download the MicroSIP softphone here
- Install the software
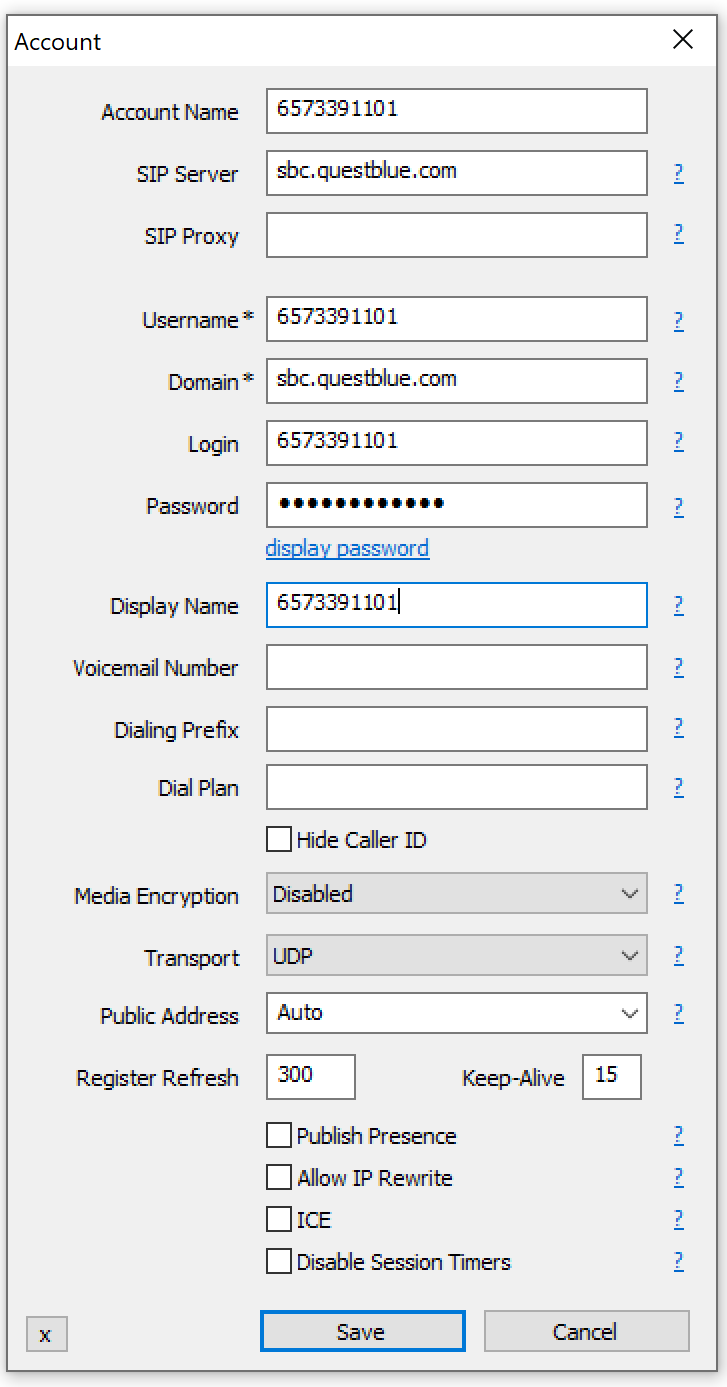
- Run the software and do the following configuration
- Click the drop-down icon at the top right of the software UI.

- Click Add Account item from the drop-down.
- Enter the SIP configuration as the capture below:
- SIP account 6573391101
- SIP Server: sbc.questblue.com
- Password: Mike03XXXX (XX is Mike birthday)

Note: password can't be shown here. Please remember your password.
Step 1: Prepare for the agent role
Option 1: Login to Agent Dashboard and Web Notifier automatically
Click here and wait until it shows you the Agent Dashboard page.
Alternative method
Option 2: Login to Agent Dashboard and Web Notifier manually
This step is only needed if the customer wants to see how an agent login to the Web Notifier or to the Agent dashboard page to manage the agent state and use the call control.
Otherwise, ignore this option. Option 1st already does both steps 1.1 and 1.2 automatically.
Step 1.1: Login to Primas Web Notifier
- Click on Primas Web Notifier
 at the top-right corner of the web browser toolbar, it will display the login screen.
 - Login to Primas Web Notifier by entering the number 40203 for 3 boxes: Username, Password, Extension and click Sign In or press Enter key
Step 1.2: Login to Agent Web Page
The agent web page helps the agent to login/logout to ACD and manage their available state.
- Click here to go to the Agent Web Page
- If it shows you a login page, use 40203 as the user name and password for logging in.
- Now, you need to login the agent to ACD queue. The Primas Agent Page has integrated with the Phone switch to allow agents to login to the ACD queue without requiring a desk phone or softphone. Follow the following steps to login the agent to ACD queue:
- From the Agent page, click
 button.
 - Enter the following information:
- Extension: 40203
- Agent ID: 50007
- Password: 40203
- Click
 button.
 - After logging in successfully, click
 to make the agent is ready to receive a phone call from a queue that the agent belongs to.
Step 2: Prepare for the ScheduleNOW
Access the ScheduleNOW demo page to act as a patient
Click here to access the ScheduleNOW self-service appointment page
Click here to access the ScheduleNOW patient portal page
- User: 1234567801
- Password: 12345678
Access the ScheduleNOW demo page to act as a clinical staff
Click here to access the ScheduleNOW back-office page
- User: support@primas.net
- Password: support01
After logging in, select the first office Clinic A - COVID-19 Vaccine
Reset after demo
We should reset demo data before doing the demo
Login to the back-office site.
Navigate to tab Tools > DB Backup
Click the "Reset demo DB" button.
Start demo
The patient makes appointments using the self-service page.
The patient receives a text message for appointment confirmation.
The patient texts confirm to confirm the appointments.
The patient texts review to review the appointments.
The patient texts cancel to cancel the appointment.
The system asks the patient ID (or employee ID)
The patient replies 1234567801
The system confirms if the patient wants to cancel the appointments.
The patient replies No.
The patient texts call to request a callback.
The system asks the patient ID (or employee ID)
The patient replies 1234567801
The system asks a reason for the contact.
The patient replies "I want to reschedule my appointments"
The patient waits to receive a callback.
The patient presses 1 twice.
The agent will receive a phone call with a popup to the ScheduleNOW and patient info.
The agent asks the patient to login into the patient portal to reschedule appointments.
The agent visits the website https://demo.schedulenow.us/patient
And login using their user name and the password:
- User: 1234567801
- Password: 12345678
The patient navigates to the Appointments tab and reschedules the appointments.
Phone call support
Place a phone call to 800.799.1613
Enter patient ID 1234567801
Wait for screen pop.
Note: the system will check the phone number matches the patient ID. You have to use the phone number that you registered with the patient ID for the demo.
Reset after demo
Go to back-office site.
Navigate to Tools > DB Backup
Click the "Reset demo DB" button.


