Step 0: First-time setup
This step only needs to do once if you haven't installed Primas Web Notifier yet.
Step 0.1: Install Primas Web Notifier (Chrome Extension)
Web Notifier helps to show screen pop to the agent. The extension only supports Google Chrome or MS Edge web browser
- If you use Chrome:
- Click here, it will open a new tab. In the new tab, click
 to install the extension.
- Click here, it will open a new tab. In the new tab, click
- If you use MS Edge (Chromium):
- Open a new browser tab, enter edge://extensions in the address bar to open the Edge extension page, and make sure the option Allow extensions from the other stores at the bottom-left of the page is on.
- Click here, it will open a new tab. In the new tab click
 to install the extension.
Step 0.2: Configure Primas Web Notifier
Optional step: Pin the Primas Web Notifier icon
After installing the Primas Web Notifier, you should see this icon![]() at the top-right of the web browser. If you don't see this icon, you can click on the icon
at the top-right of the web browser. If you don't see this icon, you can click on the icon ![]() at the top-right corner of the web browser, find the Primas Web Notifier, click the icon
at the top-right corner of the web browser, find the Primas Web Notifier, click the icon ![]() on the
on the ![]()
It will pin the Primas Web Notifier extension to the browser toolbar so that you can find the extension easier.
Step 0.3: Install and configure softphones.
The demo will use 2 softphones for text messages and phone calls.
Softphone for Text message
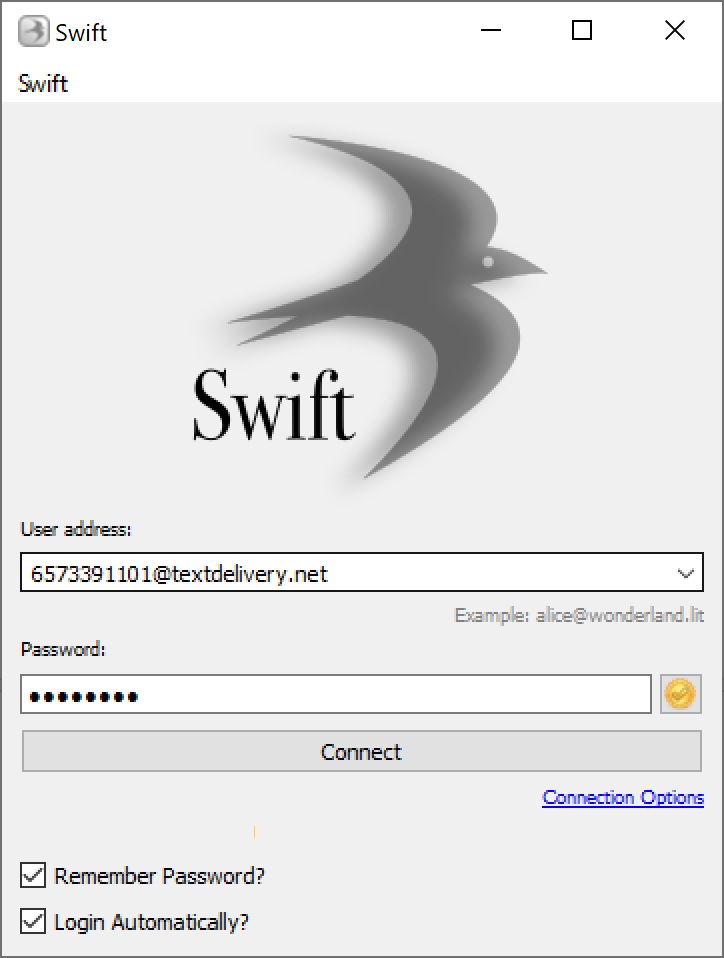
- Download Swift XMPP client here
- Install the Swift XMPP client softare.
- Run the software and login using the credentials below:
- User name: 6573391101@textdelivery.net
- Password: 11
- Check the box "Remember Password" and "Login Automatically"
- Click Connect to login and start sending/receiving the text message.
Softphone for phone call
- Download the MicroSIP softphone here
- Install the software
- Run the software and do the following configuration
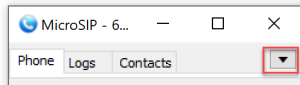
- Click the drop-down icon at the top right of the software UI.
- Click Add Account item from the drop-down.
- Enter the SIP configuration as the capture below:
- SIP account 6573391101
- SIP Server: sbc.questblue.com
- Password: Mike03XXXX (XX is Mike birthday)
- Click the drop-down icon at the top right of the software UI.
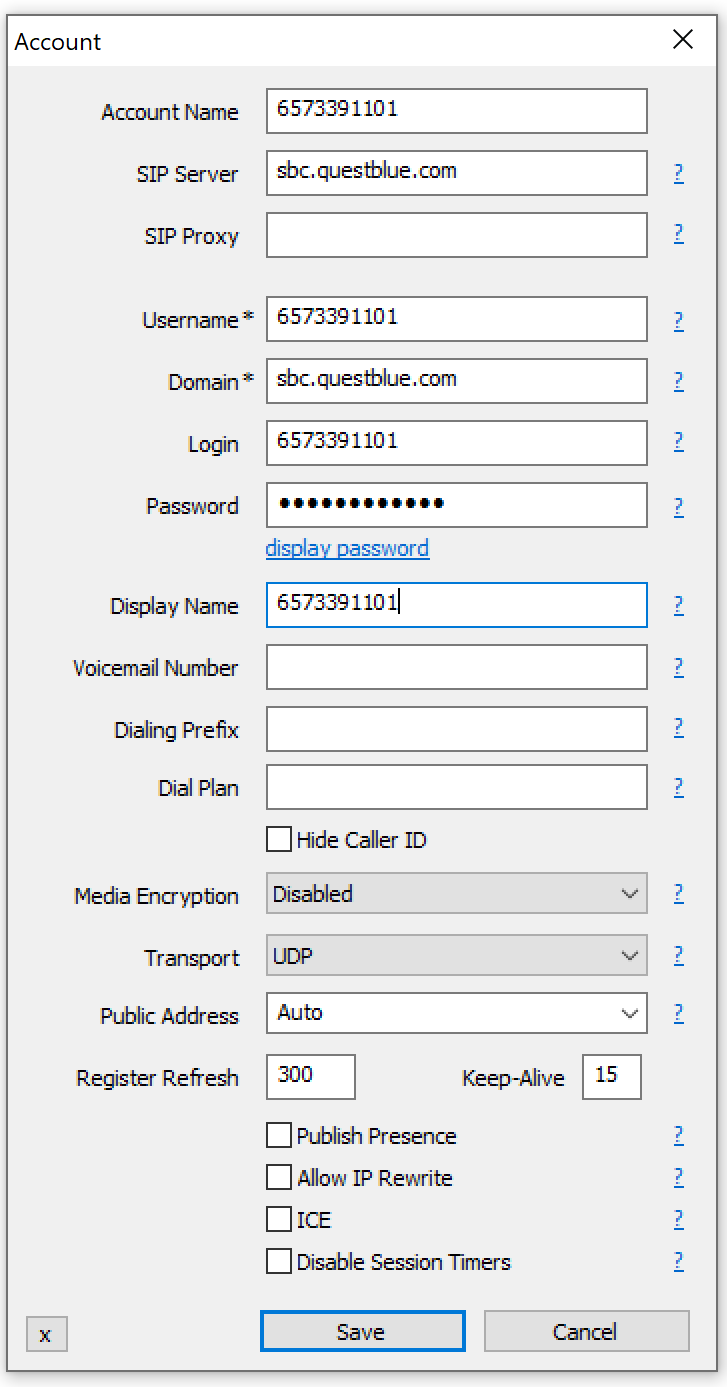
Note: password can't be shown here. Please remember your password.
Step 1: Prepare for the agent role
Login to Agent Dashboard and Web Notifier automatically
Click here and wait until it shows you the Agent Dashboard page.
Option 2: Login to Agent Dashboard and Web Notifier manually
This step is only needed if the customer wants to see how an agent login to the Web Notifier or to the Agent dashboard page to manage the agent state and use the call control.
Otherwise, ignore this option. Option 1st already does both steps 1.1 and 1.2 automatically.
Step 1.1: Login to Primas Web Notifier
- Click on Primas Web Notifier
 at the top-right corner of the web browser toolbar, it will display the login screen.
 - Login to Primas Web Notifier by entering the number 40021 for 3 boxes: Username, Password, Extension and click Sign In or press Enter key
Step 1.2: Login to Agent Web Page
The agent web page helps the agent to login/logout to ACD and manage their available state.
- Click here to go to the Agent Web Page
- If it shows you a login page, use 40021 as the user name and password for logging in.
- Now, you need to login the agent to ACD queue. The Primas Agent Page has integrated with the Phone switch to allow agents to login to the ACD queue without requiring a desk phone or softphone. Follow the following steps to login the agent to ACD queue:
- From the Agent page, click
 button.
 - Enter the following information:
- Extension: 40021
- Agent ID: 50021
- Password: 40021
- Click
 button.
 - After logging in successfully, click
 to make the agent is ready to receive a phone call from a queue that the agent belongs to.
- From the Agent page, click
Step 2: Prepare for the customer role
Access the demo page to act as the customer role and demo the Omni-Channel features.
Click here to access the demo page
Simulate customer web page:
- The default UI of the demo page is a UI with the Contact Us menu in the top-right corner which shows all the features of the Primas CX when you hover over it.
- If you want to show how the customer website looks like with Primas CX Contact Us menu:
- In the demo page, enter the customer website into the address bar and click the Go button to load the customer's website into the demo screen.
- If the customer website is a special website then the demo page will show you the message that it cannot simulate that website, click the Reset button in the top-right corner to return the default UI.
- If the customer website was successfully simulated, click the orange Edit button in the top-left corner to customize the style of the Contact Us menu to the nearest style of the original website. The demo tool provides:
- Drag and drop the Contact Us menu to any position on the screen.
- Label switch: Hide/Show the Contact Us label.
- Label color: Change the color of the Contact Us label.
- Lable size: Change the size of the Contact Us label.
- Label weight: The higher the number, the bolder
- Icon color: Change the color of the icon in the Contact Us menu.
- Detail color: Change the color of the text in the Contact Us menu.
- Font size: Change the size of the text in the Contact Us menu, the higher size, the bigger.
- Margin: Change the margin of the text in the Contact Us menu.
- After finish customizes the Contact Us menu, click the Edit button again (now is the Save button) in the top-left corner to save your custom.
- If you want to share the website which has your custom Contact Us menu, click the Copy Url button in the top-right then share it to the others.
Step 3: Start Demo
Feature 1: Web callback
This feature allows a user to request a callback directly from the website. The Primas CX system will schedule a callback to the customer based on the current queue information.
- From the Demo page, go to the Contact Us menu, click "Request a Callback"
- Enter the phone number which will receive a callback and click the "Request a call back" button.
- The system will call the phone number and play IVR.
- Press 1 for the prompt.
- From the agent web page. make sure the agent phone is open, the agent phone will ring and a screen pop will show to the agent.
- Accept the incoming call from the agent web page. Now, the agent and the customer can talk on the phone.
- Hang up the call to complete the demo.
Feature 2: Web Call
This feature allows a user to call the contact center directly from the webpage using WebRTC. The customer doesn't need a real phone to place a phone call.
- User: from the Demo page, go to the Contact Us menu, click "Web call"
- Enter the phone number you want the call center see you as your identity and click the "Call" button.
- The system will initiate a call from the web browser to the IVR.
- Press 1 for the first prompt.
- Agent: from the agent web page. make sure the agent phone is open, the agent phone will ring and a screen pop will show to the agent.
- Accept the incoming call from the agent web page. Now, the agent and the customer can talk on the phone.
- Hang up the call to complete the demo.
Feature 3: Email
The user can send emails to the contact center. The Primas CX system will queue the email message to an agent and show the email pop up on the agent desktop via a phantom phone call.
- User: from the Demo page, go to the Contact Us menu, click "Email us", it will open your default mail client.
- Or send an email message from a preferred mail client to the email address linkscope.testmail@gmail.com
- The system might send back to you an email to ask you to provide your phone number.
If in the original email, you have your phone number in the signature, it will use that phone number and will not ask your phone number. - The system will queue the email message using a phantom call to the agent.
- Agent: from the agent web page. make sure the agent phone is open, the agent phone will ring and an email pop-up will show to the agent desktop.
- Accept the incoming call from the agent web page and reply to the email message.
- Hang up the call to complete the demo.
Feature 4: Chatbot
4.1 Web Chat
A user visits the website and wants to chat to the contact center via web chat which is a chatbox at the bottom of the web page.
- User: from the bottom of the Demo page, click on the Web Chat bubble, a chatbox will open.
- Enter the information (Name, Phone Number, Email and Reason) by form.
- Select Department and click "Start conversation".
- Note:
- Choose Billing or Insurance.
- Complete the conversation with the chatbot.
4.2 FB Messenger
A user visits the website and wants to chat to the contact center via FB Messenger which is a chatbox at the bottom of the web page.
Option 1: Log into Messenger
User: from the bottom of the Demo page, click on the FB Messenger bubble, a chatbox will open.
- Click "Log into Messenger", a "Login FB" popup will open.
- Now, you need to log in to your FB account.
- After logging in successfully, click "Continue as User", a chatbox will open.
- Type a message in the chatbox.
- A chatbot will respond to your message and make some questions.
- Note: choose Billing or Insurance when the chatbot asks "With which department would you like to be connected?"
- Complete the conversation with the chatbot.
Option 2: Continue as Guest
User: from the bottom of the Demo page, click on the FB Messenger bubble, a popup will open.
- Click "Continue as Guest", a chatbox will open.
- Type a message in the chatbox.
- A chatbot will respond to your message and make some questions.
- Note: choose Billing or Insurance when the chatbot asks "With which department would you like to be connected?"
- Complete the conversation with the chatbot.
The system will queue the chat conversation using a phantom call to the agent.
Agent: from the agent web page, make sure the agent phone is open, the agent phone will ring and a chat pop-up will show to the agent desktop.
Accept the incoming call from the agent web page and reply to the chat message.
Hang up the call to complete the demo.
Feature 5: Screen Sharing
While you are chatting with the web chat user, you can demo the Screen Sharing feature:
Usecase: You want to see the user's desktop and ask the user to share the screen and the user agrees.
- Agent: From the chatbox, type sharescreen keyword and hit enter; or click into the Screen Sharing icon at the top bar of the chatbox.
- Chat user: clicks to the shared link, a web page will show in a new tab, enter the phone number or Agent ID 50021 and click the Start button on this web page to start screen sharing.
It will ask the user which screen they want to share, the user needs to select a window and click the Share button. - Agent: a confirmation message will show in the chatbox, click the Yes button. A new window will open to show the user's screen, click the Connect button to see the user's screen.
Feature 6: Video Sharing
While you are chatting with the web chat user, you can demo the Video Sharing feature:
Usecase: You want to talk to the user or see their camera. You ask the user to share the video/ audio and the user agrees.
- Agent: From the chatbox, type sharevideo keyword and hit enter; or click into the Video Sharing icon at the top bar of the chatbox.
- Chat user: clicks to the shared link, a web page will show in a new tab. The user needs to enter the phone number or Agent ID 50021. This web page has 3 share buttons at the bottom of the page.
- The first button (Voice only): connect audio between the chat user and the agent, so they can talk directly while they are chatting. This feature is helpful for international support where the caller doesn't have a local phone number to receive a phone call.
- The second button (Incognito video): one-way video _ the chat user can see the agent's video but the agent can't see the chat user's video.
- The third button (2-way video): the chat user and the agent both share the video with each other.
- Chat user: click one of those buttons to share their video or audio.
- Agent: a confirmation message will show in the chatbox, click the Yes button. A new window will open to show the user's video/audio.
Feature 7: Text while caller in queue
This feature will allow a caller to interact with text messages while the call is waiting in the queue.
- Using Web call at the Demo page to make the call to agent, press 1 to go to the Billing queue. When the call is delivered to the agent, the agent picks up the phone.
- Open another web browser, repeat the steps above to make another call.
- When the queue threshold is over 1 minute, make a phone call to 714.274.7475 using your phone, press 1 to go to the Billing queue. The system will offer FreedomQ.
You don't accept join to FQ, then press 1 to accept the text message offer. - A text message will be sent to the caller's phone number automatically. Reply text message with verification info below:
- Patient ID: H11110000
- Reason for contact: can be anything
- From the agent dashboard page, hang up the previous call, the agent phone will ring and a chat pop-up will show to the agent desktop.
Another pop-up will show in a new browser window to show the caller information. - Accept the incoming call from the agent web page and reply to the chat message.
Hang up the call to complete the demo.
Feature 8: FCR - ePop
On the agent dashboard page or the call pop up (Screen Pop), the agent can see an icon docked at the top-right corner of the window to show the repeat information with color indication
- Red: the last contact on the same day
- Yellow: the last contact is in 2 days
- Blue: the last contact is more than 2 days
Feature 9: FreedomQ callback and text while waiting for a callback
This feature will allow a customer to be called back instead of waiting in a phone queue to talk to an agent. While the customer is waiting for a callback, they can interact with text messages.
- Make sure the agent 50021 is closed by clicking the Aux work button from the agent dashboard
- Place a phone call to 714.274.7475, press 2 for the first prompt, press 1 for the second prompt, and 1 for the third prompt to accept a callback.
- Continue, press 1 to accept the text message offer.
- A text message will be sent to the caller's phone number automatically. Reply text message with verification info below:
- Patient ID: H11110000
- Reason for contact: can be anything
- Open agent by click the Auto In button from the agent dashboard
- The system will callback to the customer and play IVR.
- Press 1 for the first prompt, press 1 for the second prompt.
- The agent phone will ring and a screen pop will show to the agent.
- Accept the incoming call from the agent web page. Now, the agent and the customer can talk on the phone and reply message on the chatbox.
- Hang up the call to complete the demo.
Feature 10: Speech to Text integration
This feature will allow a caller to leave a voice message and the system will convert the message to text, then queue the message to an agent via email channel.
- Place a phone call to 714.274.7475, press 3, leave a message after the beep, and hang up.
- From the agent web page, make sure the agent phone is open. The agent phone will ring and a pop with the transcribed text from your voice message will show to the agent desktop.
- Accept the incoming call from the agent web page.
- Hang up the call to complete the demo.
Feature 11: EasyPay - Text secure payment
This feature helps the caller to provide their sensitive information such as credit card information while they are on a call with an agent without the agent perceiving.
- From the Demo page, go to the Contact Us menu, click "Easy Pay"
- Enter the phone number you want to receive a text message at Phone No text box.
- Then, select one in three ways to share a payment link to the customer:
- Text Message: the agent interacts with the customer with a text message.
- Email: the agent interacts with the customer with an email (Enter the email address at Email Address text box).
- Payment Link: the agent can copy the payment link and send it to the customer.
- Click to the payment link and enter information:
- Name on Card: can be any name
- Card Number: 4444 3333 2222 1111
- Expiration: the format is MM/YY and it must be a future date.
- CVC: three random numbers.
Feature 12: TTY - Hearing Impaired Support
This feature will support the deaf customer. When they call the contact center, the system will trigger a text message to their phone number.
- Place a phone call to 951.364.4693. The system auto hangs up the call.
- A text message will be sent to the caller's phone number automatically. The caller can interact with a chatbot via text messages.
- Complete the conversation with the chatbot.
- The system will queue the chat conversation using a phantom call to the agent.
- From the agent web page, make sure the agent phone is open. The agent phone will ring and a chat pop up will show to the agent desktop.
- Accept the incoming call from the agent web page and reply to the chat message.
- Hang up the call to complete the demo.
Feature 13: Social Listening
This feature will help businesses manage comments on their posts on the Facebook Fanpage platform, resolve sensitive issues, prevent negative issues from customers (users) before it gets worse.
- User: from the Demo page, go to the Contact Us menu, click "Social Listening".
- The web page will redirect to PrimasCX's Facebook page.
- PrimasCX's Facebook page: https://www.facebook.com/primascx/
- User: a user has negative comments on any post.
- From the agent web page, make sure the agent phone is open. The agent phone will ring and a pop-up will show to the agent desktop.
- Accept the incoming call from the agent web page and reply to this comment.
- The screen pop showing the content message of the customer.
- Hang up the call to complete the demo.
Feature 14: Predial
Predial helps Caller not have to spend much time when he calls to a busy call center. Predial will make the call and simulate key pressed to go expected agent, wait a moment (estimated waiting time) and then connect the user to the current call.
- Access to: https://predial.primas.net
- Username: admin@primas.net
- Password: primas (password pattern)
- Create a new predial with phone number what you want to call. Or use existed predial for demo.
- Training: User must train Predial how to press the key to meet the agent. Click Train and enter train number (your phone number)
- After having the script to press keys you can start to estimate the waiting time by click "Start EWT" button, the system will automatically make a call to the call center number, press keys such as trains, and estimate the time to meet the agent.
- Finally, when there is an estimated waiting time(EWT), you can click the "Start predial" button, the call will be transfer to your phone number after EWT and let you ready to talk to the agent when he pickups the phone.